CREAM CHEESE SPRITZ COOKIES

CREAM CHEESE SPRITZ COOKIES Food Recipes, Spritz cookies are one of the simplest cookies you will find and they come in many flavors. Our favorites are chocolate, butter and cream cheese. Traditionally, they are shaped with a cookie press, but if you do not have a cookie press, you can shape them in 1" balls and flatten them with a flat bottomed glass dipped in sugar. They are crispy, sweet and light as air.
These are Cream Cheese Spritz

2½ cups all purpose flour
1 cup butter (room temperature)
3 ounces cream cheese (room temperature)
1 cup white sugar
1 large egg yolk
1 teaspoon vanilla extract
1 teaspoon almond extract

Beat the butter, cream cheese and sugar until it is light and fluffy (about 3 or 4 minutes). Beat in egg yolk and extracts. Add flour ½ cup at a time until well blended. Dough will be quite stiff.

Roll dough into logs and place in your cookie press (follow cookie press directions). If you do not have a cookie press, just roll them into 1" balls and flatten with a fork or the bottom of a glass dipped in sugar. Bake cookies at 375 for 10 to 12 minutes.

If you want to decorate these cookies for the holidays, you can brush a very small amount of egg white on each cookie and cover them with sprinkles. You can also press a small piece of maraschino cherry into the center of each cookie.


Hubby likes his plain, like this


CREAM CHEESE SPRITZ COOKIES FOOD RECIPES
By Coleen Marie
Read more >>

PIZZA ROLLS - A QUICK PARTY SNACK

PIZZA ROLLS - A QUICK PARTY SNACK Food Recipes, What do you make, when you should have gone grocery shopping yesterday, and hubby says "whats to snack on?" Hmmmm, well, I did a quick check of what I had on hand and came up with this idea. The possibilities are endless; tuck in a few chopped mushrooms or pieces of broccoli, or if you aren't in the mood for pizza, fill them with cooked chicken and Alfredo sauce?

This really isn't a "recipe" as much as it is an idea. Make sure you buy the large egg roll wrappers (they are great to have on hand since they stay good in the fridge for a long time).
First, sliver the pepperoni and shred the cheese. If you use any other meat or veggie, make sure you cut it fairly small so that the cheese and sauce can melt around it (the filling will get hotter if you keep the ingredients on the small side as well).

In one corner of the wrapper, stack meat first, then cheese and sauce on top, then fold the point of the corner over the filling and tuck in the sides of the wrapper and roll them up. When you are done rolling, you will come to the pointed corner of the wrapper. "Glue" the wrapper point onto the pizza roll with a slurry of flour and water (should be the consistency of Elmer's Glue).


Fry these pizza rolls in canola oil at about 350 degrees. Watch the first few carefully since they brown very fast. If they seem to be browning too fast, turn the heat down a little.

These are addictive, and we enjoyed them dipped in ranch dressing.
NOTE: If you need a pizza sauce recipe, I hope you will try mine (CLICK HERE)
NOTE: If you need a ranch dressing recipe, I hope you will try mine (CLICK HERE)
NOTE: These can be assembled early in the day and refrigerated until it is time to cook them.

PIZZA ROLLS - A QUICK PARTY SNACK FOOD RECIPES
By Coleen Marie
Read more >>

OPEN FACE SURIMI MELT SANDWICHES

OPEN FACE SURIMI MELT SANDWICHES Food Recipes, I don't want this to sound like a commercial, but I would like to say something about Alaskan surimi (I get the impression some people aren't familiar with it). Surimi is made from boneless, skinless Alaskan Pollock fillets that are cooked and flavored with crab meat, then pressed into various shapes. Surimi can be used in place of crab or shrimp in almost any recipe. It comes in 12 ounce and 16 ounce vacuum packed pouches. Just make sure it says "made from Alaska Pollock" because I can not vouch for any other kind.

I use surimi because it is not only economical, but it comes pre-cooked and is great for a super-fast meal (hot or cold). This open face surimi melt sandwich is quick, filling and easy.

Surimi Melts
12 ounce package of crab flavored surimi (flake style)
1/2 cup chopped celery
1 tablespoon chopped chives or green onion
1/3 cup low fat mayonnaise
2 teaspoons Dijon mustard
1 teaspoon lemon pepper
3 slices of bacon fried crisp
3 English muffins split in half
2 cups shredded cheddar or pepper-jack cheese

Rough chop the surimi and mix it with the chives, mayo, Dijon, lemon pepper, crumbled bacon and 1 cup of shredded cheddar or pepper-jack cheese until well blended.

Lightly toast the split English muffins and then top with the surimi mixture (divided equally).
Top mixture with the rest of the shredded cheddar (or pepper-jack) and broil these open face sandwiches until the cheese is melted and the sandwich is hot.

NOTE: Makes six sandwiches, 300 calories each.
OPEN FACE SURIMI MELT SANDWICHES FOOD RECIPES
By Coleen Marie
Read more >>

PIZZA-STUFFED PEPPERS

PIZZA-STUFFED PEPPERS Food Recipes, In a recent issue of Pillsbury's Pot Pies & Casseroles cookbook, I found a recipe for Pizza-Stuffed Peppers, made with orzo pasta instead of rice, which intrigued me. They were very easy to make and were quite good. This would be a great recipe for kids. 1/2 cup uncooked orzo
4 cups boiling water
6 small bell peppers
10 ounces ground turkey
1/2 cup diced pepperoni
15 oz. of pizza sauce
1½ cups mozzarella shredded
1/2 cup water
Cook the orzo in 4 cups boiling water for 3 minutes (see note). Drain and rinse with cold water then set aside. Cut top off of bell pepper and clean out seeds and membranes, rinse. If pepper does not sit straight, trim a little off the bottom.
Brown ground turkey and pepperoni over medium-high heat for 4-6 minutes, stirring occasionally, until turkey is not longer pink then drain well. Stir in pizza sauce, 1 cup of cheese and the partially cooked pasta. Divide mixture evenly between the bell peppers.
Spray a 5-6 quart slow cooker with vegetable spray and pour in 1/2 cup water. Stand filled bell peppers upright in slow cooker, replace bell pepper tops. Put lid on and cook on low for 4 to 5 hours. Just before serving, remove pepper tops and top with remaining cheese, cook 5 to 10 minutes more or until cheese is melted.
To remove bell peppers from slow cooker, lift out with large slotted spoon, using tongs to support peppers (do not squeeze).
~~~~~~~~~~~~~~~~~~~~~~~~~~~~~~~~~~
I didn't make mine in the crockpot. Instead, I pre-cooked the empty bell peppers (wrapped in plastic wrap) for 3 minutes in the microwave. I then filled them with the filling mixture and baked them in a 350 degree oven for 25 minutes. I then topped them with lots of cheese (more than the recipe calls for) and baked them another 5 minutes or so until the cheese was all melty.
NOTE: There are several ways to pre-cook the empty bell peppers before you fill them. You can blanch them in boiling water, but I find that microwaving them works better.
NOTE: If you use my method of baking these bell peppers, cook the orzo for the full 9 minutes before mixing it with the rest of the ingredients. I also added about a cup of chopped mushrooms to meat mixture during the last part of its cooking time.
PIZZA-STUFFED PEPPERS FOOD RECIPES
By Coleen Marie
Read more >>

FUN FOOD FACTS & OUR DOG CHLOE

FUN FOOD FACTS & OUR DOG CHLOE Food Recipes, This is our dog Chloe, she just turned five. Our oldest son calls her "his youngest sister" (insinuating that we treat her like a human lol). We bought her from puppy rescue when she was just 6 weeks old and (by the look of the doggie toy basket) she has the run of the house. Her mother was a registered black labrador and her father a Jack Russell Terrier...so, she looks like a lab and is smart like the Jack Russell. She is a sweetie!!
I've put together a list of fun food facts that I hope you will find some use for:

1. Did you know that the pre-shredded cheese in the supermarket is coated with potato starch or powdered cellulose to keep it from clumping up? No wonder freshly shredded cheese tastes better (and melts better).

2. If you have a problem with meatballs crumbling when you brown them, chill them in the fridge for half an hour before you fry them.

3. Keep a small box of powdered milk in your pantry. It is always good to bake with in a pinch. If a cake or cookie recipe calls for cream, you can use the powdered milk (using only half of the water) and it will work.

4. Do you have toddlers at home? Freeze leftovers in ice cube trays then pop them out and store the cubes in a freezer Ziploc type bag. The smaller size microwave quickly and they make a great no-fuss lunch for your little ones.

5. Does a recipe call for just a few drops of lemon juice? Poke a lemon with a fork and squeeze out what you need, then seal the fork holes with a little butter and put back in the fridge.

6. Cottage cheese and sour cream last longer if you store the containers upside down (I put mine on a dish just in case there is something wrong with the container seal).

7. If you live in a "non-corn growing state" like I do, fresh corn on the cob can be less than primo at times. A spoon of sugar in the boiling water will give your corn a great fresh taste. This works great for fresh broccoli too.

8. When making a recipe that has blueberries, raisins, chocolate chips, etc. in it, coat them with flour before you fold them into the batter. It will keep them from sinking to the bottom of your cake.

9. If you are caramelizing sugar for a recipe, make sure you use a bright/light colored pan so you can keep an eye on the color of the sugar.

10. To keep bananas from turning brown, wrap them in a dark plastic trash bag and keep them in the vegetable crisper of your fridge. They will stay bright yellow for several days.

HAVE A GREAT (and safe) WEEKEND !!

FUN FOOD FACTS & OUR DOG CHLOE FOOD RECIPES
By Coleen Marie
Read more >>

VEGGIE CALZONES

VEGGIE CALZONES Food Recipes,
Lately I've been making calzones. They are a very versatile "hot sandwich" and since they require small amounts of filling...they are a good way to us any leftovers on hand. Hubby loves big meat sandwiches, so I've made them with leftover BBQ chicken, steak & cheese, ham & cheese, crisp bacon & cheese and yes, pizza goodies.

Personally, I like my calzones stuffed to the brim with veggies and a little pizza sauce & cheese. I have found, through trial and error, that you have to saute your veggies until tender then drain them well on a paper towel. If you don't, you will get a soggy-bottom crust on your sandwich. Any veggies will work. Roasted veggies are excellent, so are grilled veggies. Tonight I was lazy, so I just sauteed some broccoli, mushrooms, garlic, green onions and kidney beans, but usually, the more veggie variety the better.

I use my regular bread dough recipe (CLICK HERE) and jazz it up with 1/2 teaspoon black pepper, 1 teaspoon onion powder and 1/2 teaspoon garlic powder(add seasonings when you add the liquid in the recipe).

Normally, I would rather cut my arm off than show anyone my oven, but I wanted you to see MY secret for getting a pizzeria style pizza crust. It doesn't look like anything special, but it is truly the best way to cook pizza at home.
My hubby came up with this idea about 10 years ago when I was complaining that my pizza stone wasn't working the way I wanted it to (I wanted a crispy crust with nice pillowy edges). He cut a 1/4" thick piece of steel (to fit my oven) and I seasoned it like a cast iron frying pan. After you have seasoned it, you never grease it or wash it again, just wipe it off.....nothing sticks to it.
I preheat my oven (and the steel sheet) to 450 degrees and use cornmeal on my pizza peal so that the prepared pizza (or calzone) will slide off directly onto this sheet of hot steel (no pan). Bake for 8 minutes, then switch the heat to broil and (watching it carefully) let it broil for about 2 more minutes or until it is the color you want. It works great...no more doughy "steamed" crusts.

For calzones, you will need a ball of yeast dough about the size of a hardball. Roll it out to a nice thin circle. Place a mound of sauteed, and drained, veggies on one side of the circle and top them with 1/4 cup of pizza sauce (CLICK HERE FOR MY PIZZA SAUCE) and a serious hand full of grated mozzarella cheese. Fold the "empty" side of the calzone over the filling and pinch the edges together. Once pinched together, roll the pinched dough edge back onto itself to form a very tight seal. Using scissors, snip several vent holes in the top of the calzone. Bake at 450 for 8-10 minutes or until nice and golden. Just as soon as they come out of the oven, brush them with butter and sprinkle with parmesan and coarse salt.
VEGGIE CALZONE CUT IN HALF

VEGGIE CALZONES FOOD RECIPES
By Coleen Marie
Read more >>

PINEAPPLE-PECAN CUPCAKES

PINEAPPLE-PECAN CUPCAKES Food Recipes, A few days ago, Donna, over at My Tasty Treasures, posted a yummy looking recipe for Pineapple Pecan Cake. Today, I decided to cut her recipe in half and make cupcakes instead (half of the recipe makes 15 cupcakes).

With my "tweaks" I was aiming for sort of a pineapple upside down cake flavor, and it worked!! I love recipes like this, they go together with just a bowl and a spoon... and couldn't be easier.

ULTRA MOIST

Here is Donna's original recipe, and my tweaks are in blue:
2 cups all purpose flour (1 cup)
2 cups sugar (1/2 cup white + 1/2 cup brown sugar)
2 teaspoons baking soda (1 teaspoon)
2 eggs (1 egg)
1 teaspoon vanilla extract
1 teaspoon butter extract
20 ounce can crushed pineapple (8 oz. can)
1 cup chopped pecans - toasted (2/3 cup)

Stir everything in a large bowl, just until moist. Bake in a greased 9x13 pan (I used paper-lined cupcakes) and bake at 350 for 30-35 minutes (I baked my cupcakes for 18 minutes).

NOTE: Do not drain the crushed pineapple.

FROSTING
8 ounces of cream cheese (softened)
1 stick of butter (softened)
2 cups powdered sugar
1 tablespoon (yes tablespoon) of vanilla
Mix until smooth

NOTE: These cupcakes are exceptionally moist even though they have no oil or butter in the batter. They actually taste a lot better at room temperature than they do when they are hot.

PINEAPPLE-PECAN CUPCAKES FOOD RECIPES
By Coleen Marie
Read more >>

RICE STUFFED MUSHROOMS

RICE STUFFED MUSHROOMS Food Recipes, The origin of this recipe is fairly humble: Hubby was hungry for steak and I was not, so I stuffed some large button mushrooms full of leftover spicey red  rice and topped them with Monterrey Jack cheese and baked them. They were so good, I ate way too much...the rest of them I re-heated (microwave) for lunch the next day and they were excellent.


I used a melon baller to scrape out the gills of the large mushrooms which made a nice pocket for the rice.
I stuffed the raw mushrooms full of (cold) red rice. Place the stuffed mushrooms in a 9 x 13 baking dish and top with shredded Monterrey Jack cheese.


Bake in pre-heated 350 oven for 15 minutes then turn on the broiler for a minute or two and serve.

Delicous and good for you if you go easy on the cheese.


RICE STUFFED MUSHROOMS FOOD RECIPES
By Coleen Marie
Read more >>

SOURDOUGH PANCAKES

SOURDOUGH PANCAKES Food Recipes, There is something sweetly nostalgic about the smell of sourdough pancakes cooking. I guess it is because my children were raised on them and these days, when I cook them, it is almost as if the kids should be walking in the door any minute. You can use almost any kind of fruit in these pancakes (this time it was raspberries). They are also delicious with no fruit...just good old butter and maple syrup.

STEP ONE: This is called the "Sponge"
48 to 72 hours before you want to serve these pancakes (you will get a stronger sourdough taste if you start 72 hours before) mix the following ingredients.

2½ cups of all purpose flour
2 cups water
2 packages of dry yeast (I use 2 tablespoons)
1 teaspoon white sugar

This next direction sounds trivial, but please pay attention to it...mix the above ingredients in a 2 quart  pitcher that has a tight fitting lid on it (crack the lid open just a little bit...but not much). This step is important because about 30-45 minutes after you mix the ABOVE ingredients the batter will REALLY increase in volume. Then, an hour after that, it will DECREASE in volume as the sponge starts to "sour". If you do not have it in a large enough container for that first volume increase...you will have a mess. Trust me!!


STEP TWO:

After 48 (or 72) hours, covered (at room temperature), stir the batter (it is going to be thick), and add:

2 eggs
1 teaspoon baking soda
1 teaspoon salt
1 tablespoon white sugar
2 tablespoons vegetable oil


Mix well and wait about 10 minutes. During this 10 minutes, the batter will increase in volume AGAIN (another reason for that 2 quart pitcher). If you are going to add fruit, now is the time to gently stir it into the batter, let batter sit for about 5 minutes, then cook pancakes on lightly greased griddle.  Serve with butter and maple syrup.

WAFFLES: This recipe can be adapted for waffles as well. It makes the lightest crispiest waffles you've ever tasted. 

Follow directions for "step 1".  After "step 1" has proofed for 48 hours (or 72 hours), stir and add the following:

1 teaspoon salt
2 tablespoons sugar
1 teaspoon baking soda
2 eggs
1/4 cup vegetable oil.

Mix well and let sit for about 5 minutes; bake in waffle iron.

NOTE: If you are using frozen fruit, make SURE it is completely thawed and drained  before stirring it into the batter because your pancakes will take three times as long to cook if you stir in frozen fruit.

NOTE: You can use this batter in as little as 12 hours from the time you mix the first step, however, you will not taste the traditional sourdough taste as much as if you let the first step sit for 48-72 hours.

NOTE: Don't freak out if you see clear liquid floating on top of your batter after the 48-72 hours (that's the good stuff that makes it really taste like sourdough); just mix it back in.

NOTE: If you do not have a 2 quart juice pitcher with a lid, you can use a 2 quart bowl and top it with Saran Wrap. Make sure the Saran Wrap is on tight, then poke a TINY vent hole in it.
SOURDOUGH PANCAKES FOOD RECIPES
By Coleen Marie
Read more >>

CHOCOLATE-VANILLA CHEESECAKE

CHOCOLATE-VANILLA CHEESECAKE Food Recipes, I served this delicious new recipe last weekend. Hubby and I couldn't stop nibbling on it. It has a bottom chocolate layer and a top vanilla layer, then I topped it with my newly discovered cream cheese-whipped cream. Talk about a one-two punch!! It is super quick to make and baked up without a single "crack".
CHEESECAKE
4 squares semi-sweet baking chocolate

(2) 8 ounce cream cheese (divided)
1/2 cup sugar (divided)
2 eggs (divided)
(1) 6 ounce Oreo pie crust
1 teaspoon vanilla extract

Microwave the chocolate (on high) for 1½ minutes (stirring every 30 seconds) or until completely melted. My microwave only took about 50 seconds.

To the melted chocolate, add one 8 ounce package of cream cheese, 1/4 cup of white sugar and one egg. Beat until well mixed and pour into Oreo crust. In a different bowl, mix one 8 ounce package of cream cheese, 1/4 cup of white sugar, one egg and 1 teaspoon vanilla extract. Beat until smooth and pour over the chocolate filling. Bake in preheated 350 oven for 40 minutes or until center is almost set. Chill for at least 3 hours then frost with whipped topping & sprinkle with toasted sliced almonds.

CREAM CHEESE-WHIPPED CREAM TOPPING
(1) 8 ounce package of cream cheese
1/2 cup white sugar
1 teaspoon vanilla extract
1/2 teaspoon almond extract
2 cups heavy whipping cream
toasted sliced almonds

Combine room temperature cream cheese, sugar and extracts in a large mixing bowl. Beat until very smooth. With the mixer still running, slowly pour in the whipping cream (stop once in a while to scrape down the interior walls of the bowl). Continue to beat until cream forms stiff peaks.

This is a very sturdy whipped cream and will not deflate (there is still one piece of this cheesecake in the fridge (calling my name) and the whipped cream still looks as good as it did on Sunday).
NOTE: I did not have an Oreo crust, so I made a graham cracker crust and used a 10" pie plate. I didn't find out, until the cheesecake was in the oven, that an Oreo crust is only 8½" across, so my cheesecake came out a little on the thin side.
NOTE: Next time I make this recipe, I plan on making individual size cheesecakes by baking them in (cupcake paper lined) muffin tins. I am also going to alternate spoonfuls of chocolate and vanilla batter and run a knife through the batter to "marble" it.

NOTE: If you ever forget to bring the cream cheese up to room temperature, use this trick: unwrap cream cheese completely and microwave it on high for 10-15 seconds. (my microwave takes 13 seconds).
CHOCOLATE-VANILLA CHEESECAKE FOOD RECIPES
By Coleen Marie
Read more >>

ULTRA TENDER PORK RIBS

ULTRA TENDER PORK RIBS Food Recipes, This is more of a cooking technique than a recipe. I've made country style boneless pork ribs using this technique for as long as I can remember and they are fork tender every time. I am guessing that most of the experienced cooks out there already know this method, but there might be a few younger ones who would like to try this.

Look for boneless country style pork ribs (the leaner the better) in the meat market. An hour before you want to grill, cut them in to sections about 4" long and put in a large sauce pan and enough water to cover them. Add a tablespoon of salt and a teaspoon of black pepper.
Bring this to a boil on high. After a few minutes, you will see some "crud" float to the surface. Don't get grossed out, but it will look like this:

Skim it off and throw it away (you may have to do this a couple of times). Reduce the heat to a gentle boil and boil for 45 minutes. Pull one of the pieces of pork out of the pan and see if it is fork tender. If not, boil for another 15 minutes (but no longer). Some pork tends to be tougher than others.
Drain pork and put it into a bowl. Drizzle with enough melted butter to coat each piece. Put the pork onto the barbecue grill and coat with your favorite barbecue sauce. Keep turning and basting until the barbecue sauce starts to crisp up on the edges (usually only takes about 10-15 minutes tops.
These ribs are So flavorful and you don't even need a knife to cut them. I hope you will try this technique.

NOTE: Country style pork ribs are usually cut about 2" wide and 10" or so long. Ask your butcher if you can't find them. Make sure you get the boneless ones (better value).

ULTRA TENDER PORK RIBS FOOD RECIPES
By Coleen Marie
Read more >>

PITA BREAD

PITA BREAD Food Recipes,
Pita bread made with a bread machine, what could be easier? The only trick is to roll them thin enough (I didn't roll my my first batch thin enough and they were lofty little pillows, but bad minimal pockets). The thinner batch made perfect pocket pitas.

This was a quick fun project and the final results were delicious, you will never be happy with grocery store pita's again.


1 and 1/8 cups warm water
3 cups all purpose flour
1 teaspoon salt
1 tablespoon vegetable oil
2 teaspoons white sugar
2 teaspoons active dry yeast

Put everything into the bread pan of your bread machine, select dough setting and start. Let dough going through first rise.

Turn dough out onto your floured counter. Knead dough a few times then divide into 8 equal pieces and roll each piece into a ball. With a floured rolling pin, roll each ball out into a 6" circle (dough will be very thin). Lay circles on lightly floured surface and cover with a dry light-weight dish towel. Let it rest for 30 minutes or until slightly puffy.

In the meantime, heat your oven to 500 (yep! 500) and place a wire cake rack into your oven (set it right on the oven rack...no pan please). Gently lift a circle of dough and gently place it on the hot cake rack (bake 2 at a time). Bake for five minutes until they are super-puffed and lightly brown. Remove with spatula and place in a brown paper bag (I just used some lunch bags) and make sure you seal up the bag well (I used a chip clip to seal bags) and let the pita's cool in there. I don't know why this step is necessary, but that is what the recipe calls for. They will look like this:
When they are cooled, you can split them open or cut off one end. We really enjoyed these and I will definitely make these again.


NOTE: I don't have a bread machine, so I just made the dough in my stand mixer and let it rise for about an hour.
NOTE: Alaska has almost non-stop daylight in the summers which accounts for the huge vegetables people grow here, especially the cole crops.
PITA BREAD FOOD RECIPES
By Coleen Marie
Read more >>

PEANUT BUTTER RICE KRISPIE TREATS

PEANUT BUTTER RICE KRISPIE TREATS Food Recipes, A few weeks ago, Heidi at Tried-and-True Cooking with Heidi posted a recipe that she called Old-School Peanut Butter Squares. The recipe caught my eye because it does not call for marshmallows (we like marshmallows, but they aren't always in the pantry). The only tweak I made was to substitute some of the sugar for a little honey (I love the taste of peanut butter with honey). I must say the treats were a big hit around here. With mom's packing school lunches these days, I thought it would be a good time to repeat Heidi's super simple and super tasty recipe.

1 cup light corn syrup
1 cup white sugar (see note)
1 cup peanut butter
5 cups crisp rice cereal

Combine corn syrup and sugar in medium saucepan. Stir until well blended and cook on medium heat until boiling (stirring occasionally). Let boil for 30 seconds and remove from heat. Stir in peanut butter and mix until well blended. Stir in cereal and mix well. Pour into greased 9x13 pan. Lightly spray hands with cooking spray and press mixture into pan. Cool and cut into squares.

NOTE: I removed 2 tablespoons of sugar and replaced it with 2 tablespoons of honey.
NOTE: I let my syrup mixture gently boil for a full minute.
NOTE: I found that you don't have to spray your hands with cooking spray when you press down the mixture. If you dampen your hands and just shake them dry for about 5 seconds, it does the same thing without making the treats greasy.

PEANUT BUTTER RICE KRISPIE TREATS FOOD RECIPES
By Coleen Marie
Read more >>

GREEN ENCHILADA SAUCE

GREEN ENCHILADA SAUCE Food Recipes,
I have always cooked with canned Ortega mild fire-roasted chilies (if hubby doesn't know they are in a recipe, he magically does not get heartburn lol). However, I have put off the urge to cook with fresh Anaheim chilies because I think he would seriously panic if he saw them. Well, recently, the opportunity to cook with fresh Anaheim's presented itself (hubby wouldn't he home for dinner) so I went for it. They were delicious!!

SURIMI ENCHILADAS WITH GREEN SAUCE

3 fresh Anaheim chilies
1 to 2 cloves of garlic
1/2 cup of chopped onion
2 tablespoons olive oil
1 teaspoon cumin
1 to 3 teaspoons mild chili powder
1 teaspoon salt
2 cups chicken broth
2 tablespoons flour

Wash and dry the chilies and put them under the broiler for 5-10 minutes (my broiler took about 8 minutes) turning the chilies about once a minute. You want the skins of the chilies to blacken on at least 60% of their surface. Remove them from the broiler and place them in a Tupperware container with a tight lid (this will help steam the chilies) for about 15 minutes. Next step is to peel off their skins, cut open and remove seeds and dice flesh; you should have about one cup of diced chilies (set aside).

In a frying pan, heat the olive oil and saute the onions and garlic until they are tender and mellow, then put them in a food processor along with 1 cup of prepared chilies, and 1/2 cup of the chicken broth and 2 tablespoons of flour; process until smooth. Transfer to a sauce pan and add the chili powder, cumin, salt and the remaining 1&1/2 cups of chicken broth. Cook until thick and bubbling; lower heat and simmer slowly for about 20 minutes. Use immediately.

While this enchilada sauce can be used on beef enchiladas, it does better with chicken or seafood. The enchiladas pictured here were made with surimi (fake crab). I just chopped the surimi into smaller pieces, mixed it with Monterey Jack cheese and a little of the green enchilada sauce and rolled the filling in tortillas, poured the sauce over them and topped with more cheese. Bake for about 30 minutes or until everything is hot and bubbly. They were light and tasty.

NOTE: I only used 1 teaspoon of mild chili powder. If you like more kick, add more.


GREEN ENCHILADA SAUCE FOOD RECIPES
By Coleen Marie
Read more >>

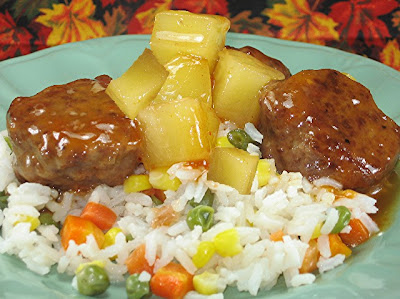
SWEET AND SOUR MEATBALLS

SWEET AND SOUR MEATBALLS Food Recipes, Hubby has a serious sweet tooth; he even likes SOME savory dishes on the sweet side, like this (quick and easy) sweet and sour sauce. It works equally as well with chicken, pork, country style ribs and shrimp.
SWEET AND SOUR MEATBALLS
MEATBALLS
1 pound of very lean ground beef
5 tablespoons dry bread crumbs
1/4 cup of milk
1 egg
1 teaspoon salt
1/2 teaspoon black pepper

Mix all ingredients and shape into walnut size balls. Bake for 20 minutes at 375, then drain on paper towels.

SWEET AND SOUR SAUCE
In large sauce pan, mix:
1 cup water
1/4 teaspoon salt
1/2 cup white sugar
1/3 cup apple cider vinegar
1/4 cup ketchup
1 teaspoon soy sauce
1/4 teaspoon dry red chili flakes (I use only a pinch)
(1) 8 ounce can of pineapple chunks undrained

Bring everything to a boil and thicken with 2 tablespoons of cornstarch mixed with 1/4 cup of water. Bring back to a boil, stirring constantly. When the sauce has thickened, turn the heat down to a very slow simmer and add the baked meatballs. Continue simmering for about 20 minutes. Serve over rice.

NOTE: We don't care for a lot of "heat" in our food, so I use a scant 1/4 teaspoon of red pepper flakes.

NOTE: Bake the meatballs for 15 to 20 minutes, depending on how large you make them. I turn on the broiler for the last 2 or 3 minutes to give the meatballs some color.


SWEET AND SOUR MEATBALLS FOOD RECIPES
By Coleen Marie
Read more >>

PEACH PIE and a QUESTION ABOUT CURRY POWDER

PEACH PIE and a QUESTION ABOUT CURRY POWDER Food Recipes, Our fall is revving up...the Alaska State Fair is underway and it is the absolute end of our growing season (we will have frost in less than two weeks). What does all that mean? It is finally cool enough to bake to my hearts content, which makes me a happy camper.
Hubby is the pie eater at our house and he likes thinner pies as opposed to deep dish pies, so I started baking his pies in a two piece tart pan. At first I resisted, but soon discovered that the tart pan not only makes a prettier pie, but they are also much easier to serve (no pie plate corners to maneuver around when your cutting that first piece).

CRUST
2 and 1/2 cups all purpose flour
1/2 teaspoon salt
1 cup ice cold butter
6-8 tablespoons ice water
Place the flour, salt and cold butter (cubed) into a food processor and pulse a few times until you get fine crumbs. Pour this mixture into a bowl and add 6 tablespoons of ice water. If the dough is too dry, add more ice water (1

tablespoon at a time) until the dough hangs together in a ball. Divide your dough in to two pieces (top crust + bottom crust). Wrap one piece in plastic and put it in the fridge. Dust your counter with flour and roll out the other piece of dough to an 1/8" thickness. Place it in the pie plate (or tart pan). Do not stretch the dough. Place this bottom crust in the fridge while you make the fruit filling.

PEACH FILLING
5 cups of fresh peaches (peeled and sliced)
1/2 cup white sugar
1/2 cup brown sugar
1/2 teaspoon cinnamon
1 teaspoon vanilla extract
1/2 cup all purpose flour
1/4 teaspoon salt
2 tablespoons butter
Mix the sugars, cinnamon, flour, salt and peaches (gently) until everything is moistened. Stir in vanilla extract. Remove bottom crust from the fridge and "paint" the INSIDE surface of it with egg wash (1 egg mixed with 1 tablespoon water ). This will help keep the bottom crust from getting soggy while baking. Pour the fruit filling into the bottom crust and dot the filling with small pinches of cold butter.

Roll out the top crust...place it on top of the fruit and pinch the edges (if you are using a pie plate) or run your rolling pin across the edges if you are using a tart pan. Cut a vent hole in the top pie crust. Brush egg wash over the surface of the pie and sprinkle with white sugar. Bake in a PREHEATED 450 oven for 15 minutes, then lower the heat to 350 for 30 more minutes. Remove pie from oven and cool at least 3 hours before cutting.
NOTE:
When I bake a pie in a standard pie plate (especially glass pie plates) I spray the plate with just a little cooking spray. This helps when it comes time to remove the pie, especially if some of the juices have found their way under the crust. This is not necessary with the two piece tart pan.

NOTE: Mix dough as quickly as possible (when using your hands) so that you don't warm up the butter.
NOTE: When you paint the inside bottom crust with the egg wash, be careful not to get too much of it up by the top edge of the tart pan (or the crust will get glued to the pan).

NOTE:
Put a cookie sheet under your pie pan while it is in the oven just in case you have spill overs.

CURRY POWDER QUESTION: I have been looking at some recipes that use curry powder. I have zero experience with curry powder and a quick check on the Internet confused me even more. I guess there are many kinds of curry powders (hot, sweet, etc.). What should I watch for when purchasing curry powder. I want to try a chicken salad recipe that just says " 1/2 tsp. curry powder"...what do I buy? Any suggestions or helpful hints would be appreciated.


PEACH PIE and a QUESTION ABOUT CURRY POWDER FOOD RECIPES
By Coleen Marie
Read more >>
 

All About Women Copyright © 2011 Design by Panji Media