CRANBERRY SHORTBREAD BARS

CRANBERRY SHORTBREAD BARS Food Recipes, This week, I have been trying out some new "goodie" recipes with the holidays in mind; I like to add a few new items to my standard cookie boxes every year. Today I made some cranberry shortbread bars that I found in a holiday issue of Fine Cooking and they are definitely going to make the "big list". The bars have an ultra-buttery shortbread crust topped with cooked cranberries and then a shortbread-type streusel topping. They are baked in a 9 x 13 pan that is lined with foil for easy removal. The bars are very sweet, buttery, tender and cut nicely...perfect for gift giving.

Wash and sort a 12 ounce bag of fresh cranberries. Put them in a heavy saucepan with ¼ cup of water and one cup of white sugar. Bring to a boil over high heat. After it comes to a boil, reduce the heat to medium high and boil until the sauce is like a thick syrup - 5 to 8 minutes (mine took 6 minutes). Set aside to cool (it will thicken even more as it cools).
SHORTBREAD CRUST
21 tablespoons of butter, melted and cooled to room temp.
This seems like a lot of butter, but it makes an upper and lower crust
¾ cup of white sugar
2 large egg yolks
3 cups + 3 tablespoons all purpose flour
No need to use an electric mixer, I did it all with a wooden spoon. Mix the sugar into the melted butter and whisk in the egg yolks. Stir in the flour to make a very stiff dough. Remove two cups of this dough and pat evenly into a foil lined 9 x 13 pan. Prick the dough all over with a fork and refrigerate for 30 minutes (or put in freezer for 7 minutes). Set the rest of the dough aside.
With the remaining dough, run a fork back and forth in the dough to loosen it up into crumbles Add ¼ cup of white sugar to these crumbles and work the fork back and for a little more to break up any large clumps. Do not chill these crumbles.
Bake the 9 x 13 chilled pan of dough, on the middle rack of your oven, for 20 minutes at 325. After 20 minutes, the dough will still be very pale in color and will not have any golden color on the edges. Remove it from the oven and spread the cooled cranberry filling evenly over it.
Spread the loose crumbles over the cranberry filling

Bake on the TOP rack of a 350 oven for 25 minutes (mine took 32 minutes). Watch the crumbles towards the end of the baking time. You want to see a little golden color on the top of the crumbles, like this:
Cool baked bars on a wire rack for at least an hour or until completely firm. You can speed set them in the fridge. When the bottom of the pan is completely cool, lift the bars out of the pan by pulling on the flap ends of the foil. Cut into 2" bars. These will keep at room temperature for a week.

NOTE: The butter measurement of 21 tablespoons is not a typing error
NOTE: Bake the bars in a metal 9 x 13 pan so they don't over bake. Line it with foil and leave the ends of the foil a little long, so you can use them as handles to lift the cooled bars out of the pan.
NOTE: Pay attention to baking temperatures. The first crust pre-bake is on the middle rack at 325. The final bake is on the TOP rack at 350. The recipe says it is baked on the top rack so that the bottom of the crust doesn't get too dark.

CRANBERRY SHORTBREAD BARS FOOD RECIPES
By Coleen Marie
Read more >>

APPLE PECAN DESSERT

APPLE PECAN DESSERT Food Recipes, This great dessert is a combination of three different recipes. Under the rich, nutty, cookie layer is a layer of ooey-gooey cinnamon apples. Served with whipped cream or vanilla ice cream, it is just delicious. Oh by the way, did you know that you can buy vanilla ice cream with sprinkles IN it? You can see the sprinkles in this photo. I had no idea this product was even available (I thought I bought plain vanilla). Needless to say, even though there is a gallon of this ice cream in the freezer, Hubby has written his request on the grocery list (that is always on the front of the fridge), he wrote "vanilla ice cream NO SPRINKLES". He is mighty particular about his ice cream.

TOPPING
1 cup all purpose flour
½ cup butter, room temperature
1 cup brown sugar
½ teaspoon cinnamon
¼ teaspoon baking soda
1 egg
½ cup chopped pecans (divided)
1 teaspoon vanilla extract

Cream ½ cup of butter with 1 cup of brown sugar and ½ teaspoon of cinnamon until well mixed; add 1 egg and mix well. Stir in the flour, baking soda and ¼ cup of the pecans. Mix until smooth, batter will be very thick. Set aside

APPLE FILLING
Peel and slice 4 large granny smith apples. Toss the sliced apples with ½ cup brown sugar + ½ cup white sugar + ¼ cup all purpose flour + ½ teaspoon of cinnamon. Make sure all of the apples are well coated and place them in a greased 10" pan or 10" deep pie plate. Spread with topping and bake at 350 for 45 minutes.
Let baked dessert sit for at least 30 minutes before you serve. When it first comes out of the oven, the apple filling will appear to be thin. However, as it cools, the sauce in the filling will thicken considerably. Serve warm (or room temperature) with ice cream (with no sprinkles).

APPLE PECAN DESSERT FOOD RECIPES
By Coleen Marie
Read more >>

CROCKPOT MAPLE PORK TENDERLOIN

CROCKPOT MAPLE PORK TENDERLOIN Food Recipes, This recipe gets five stars for two reasons...it is totally delicious AND super simple. As a matter of fact, it is one of the best crockpot recipes that I've tried in a long time. You can not get much simpler than this: brown the pork loin, cover it with sauce and 8 hours later (my crockpot only took 6 hours) and you have fork-tender, delicious pork loin and a gravy that is amazing.

2½ pound boneless pork loin
1 cup real maple syrup (DON'T USE PANCAKE SYRUP)
4 tablespoons Dijon mustard
2½ tablespoons cider vinegar
2½ tablespoons soy sauce
salt and pepper

I bought my pork loin, vacuum packed from Walmart (2½ pounds seems to be a standard size). When you open the package, there will be two long loin pieces. I cut each one into three pieces, then salted and peppered them and browned them in a little olive oil. Place the browned pieces in a wide crockpot for even cooking (as opposed to the tall ones).

In a small bowl, whisk the maple syrup (do not use pancake syrup, it is way too sweet and will ruin your pork, trust me), Dijon mustard, cider vinegar and soy sauce together. Pour over browned pork loin pieces. Cover and cook on low for 8 hours (my crockpot took only six hours). If you use a different cut of pork, you may have to use the full 8 hours. It isn't absolutely necessary, but try and turn the meat over a couple of times during the cooking process. When it is time to eat, thicken the gravy. I served this with rice and coleslaw. It also made delicious sandwiches the next day.

NOTE: If you are concerned about the maple flavor being overpowering...don't be. As a matter of fact, it is almost a background flavor, but it IS there and the meat was extremely tender and slightly sweet. This is a fantastic recipe for any special occasion. My hubby is a pineapple addict, so I'm sure the next time I make this we will try adding a little pineapple. This recipe is definitely going into my "keeper" file.


CROCKPOT MAPLE PORK TENDERLOIN FOOD RECIPES
By Coleen Marie
Read more >>

BASIC WHITE BREAD

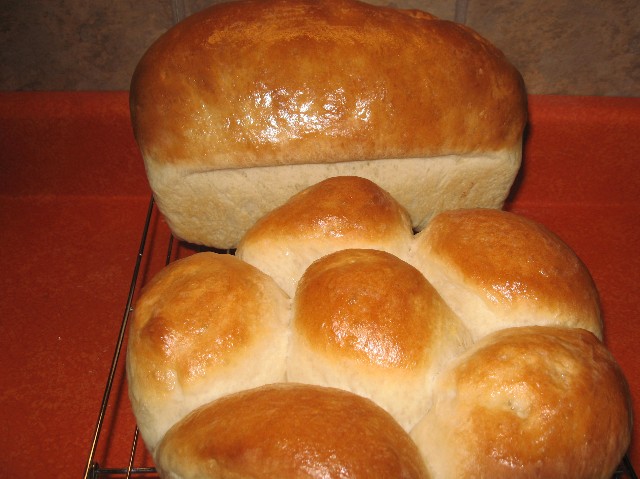
BASIC WHITE BREAD Food Recipes, I've been making this bread recipe for nearly 40 years and it has never failed me. It is a basic white bread that goes together in minutes (I make this recipe about once a week). It is fool proof and a great recipe for beginning bread makers.


5 cups all purpose flour
3 tablespoons granulated sugar
1 tablespoon table salt
2 envelopes of active dry yeast
3 tablespoons vegetable oil
2½ cups very warm water

In the bowl of a stand mixer, place 2 cups of all purpose flour, 2 packets of dry active yeast (I use 2 tablespoons because I buy it in a larger jar), 3 tablespoons of granulated sugar, 1 tablespoon of table salt and 3 tablespoons of vegetable oil (I use canola oil). Stir together
NOTE: Normally, most yeast recipes have you dissolve the active dry yeast in water that is 110 degrees before you add it to the flour. However, 99.9% of the time I do not do it that way. If you mix the dry yeast into the dry flour, you can add even hotter water because the flour will cool down the water before it can damage the yeast. That may sound complicated, but it isn't. The warmer water will jump start your yeast and your dough will raise faster with this method. It works so well that it is the only way I make bread (I use water that is 120 degrees). You can use an instant read thermometer to check the temperature of your water (when you first start to work with yeast) although you will quickly learn what temperature the water is by just holding your hand under the faucet.
Stir 2½ cups of 120 degree water into the flour mixture and stir vigorously with a wooden spoon while you pour. Let this mixture sit for about 10 minutes.


Add the rest of  the flour (half cup at a time) beating well in between. When the dough gets too hard to mix with your spoon, attach your dough hook to your stand mixer and turn on low.

Now here's a tip: when making dough, at this stage, something called "dough shag" is (can be) your enemy. If you add too much flour, too fast, you will get "dough shag" or shaggy pieces of dough.
In the next photo, see the dry white sections/layers next to the wet dough? That's called shag,
Click on the photo to see the shag more clearly
Shag is not totally a bad thing, it is just a clue that it is NOT time to add more flour. NEVER ADD MORE FLOUR IF YOU CAN SEE SHAG. Here is another photo, see the shag?
 I intentionally added the flour a little too quickly so you could see this effect.
Click on photo

Don't panic if you see shag, just keep "kneading" with your dough hook (or by hand) and the shag will eventually incorporate into the wet dough. Don't add more flour until it looks more like this:
Eventually, you will get all 5 cups of flour into the dough. When that happens, let your machine knead the dough (gently, on a low setting) for about 6-8 minutes. Stop you mixer every once in a while and pull all the dough off of the dough hook, scrape down the walls of your bowl and turn the ball of dough completely over and start the mixer again. You will have to do this a few times until the shag totally disappears and the dough clings together in a nice semi-solid "lump".

At the end of 6 to 8 minutes (exact time is not crucial), the dough should have worked itself into a smooth ball that stays on the dough hook when you raise the hook out of the bowl. The interior sides of the bowl should be fairly clean. It should look like this:

See how the dough ball has "cleaned" all of the little bits off of the bottom and sides of the bowl? This is what you want to see. The dough will not be sticky and it will feel like play doh when you touch it. If the dough is too soft, it will pull itself off of the dough hook. If that happens, add another quarter cup of flour and knead it a little longer.

Remove your dough from the dough hook, form it into a ball and place it in a greased bowl (I use Pam). Spray the top of the dough with a little Pam, and cover it with plastic:

Place this covered bowl of dough in a nice warm place in your kitchen. Room temperature is OK, but if you have a warmer place (less than 100 degrees) place it there. After an hour, your dough will have risen substantially, (hopefully doubled in size).


Your risen dough should look like this

When the dough has fully risen, turn it out onto your counter (some people say flour the counter at this stage, but I NEVER do) and push all of the air out of the dough. Cover it with an inverted empty bowl and let it sit for 15 minutes to relax (this will make your dough much easier to work).

Depending on how you want to shape your dough, follow these general directions, but use your imagination. For a loaf of bread, depending on the size of your loaf pan, this recipe will make 2 or 3 loaves. If you are using a big loaf pan, cut the dough in half. Roll it out into a large rectangle and then roll it up, pinching the ends shut. Place in greased loaf pan. spray the top of the dough with a spritz of cooking spray and cover loosely with plastic wrap. Let raise for an hour or until doubled in size.

If you are making rolls, just pinch off pieces about the size of a plum and roll them into a ball. Place in a greased baking dish (touching each other) and spritz the top with a little cooking spray and cover with plastic wrap. Let raise for an hour or till doubled in size.

I also make hamburger buns with this recipe (makes about 2 dozen). Once baked, they freeze well and I find myself using them for everything from burgers, to breakfast sandwiches, to peanut butter sandwiches.

Bake the loafs in a 400 degree preheated oven for 25 minutes. Remove from pan immediately. Bake rolls (and burger buns) at 400 for about  16-18 minutes, remove from pan immediately.
NOTE: Yeast comes in little envelopes ¼ ounce envelopes (2¼ teaspoons per envelope). However, I buy yeast by the jar, so I always just use a tablespoon of yeast (3 teaspoons). Any dry active yeast will work.

NOTE: You will have much more success in your bread making if you understand that the amount of flour that goes into a recipe varies from day to day. Many serious bakers weigh their flour, but I find that keeping a close eye on how the flour is "behaving" works better than weighing. On a humid day it may take an extra tablespoon, on a rainy day a tablespoon less. So be stingy with that last half cup of flour until you see how the dough acts in YOUR climate. Keep in mind that the less flour you use, the more moist your bread will be.

NOTE: A lot of people have granite counter tops which are always cool to the touch. This will effect the length of time your bread takes to raise. I suggest that you find a warmer place to let your bowl of dough raise than on the granite.


BASIC WHITE BREAD FOOD RECIPES
By Coleen Marie
Read more >>

RASPBERRY FILLING

RASPBERRY FILLING Food Recipes, This recipe for raspberry filling can be used a dozen different ways. You can use it in puff pastry turnovers like the photo below, or between cake layers, inside cupcakes or donuts, on french toast, on ice cream, on cheesecake and on and on. It is a great basic recipe that only takes a few minutes to put together and can easily be doubled.

(1) 12 ounce bag of frozen raspberries (not in syrup)
½ cup + 3 tablespoons of water
¾ cup white sugar
1 tablespoons lemon juice
3 tablespoons cornstarch
¼ cup cold water

Gently simmer the raspberries, water, sugar and lemon juice for 15 minutes, in a small heavy bottomed pan. After 15 minutes, you can push the berries through a sieve if want a seedless filling (I leave the seeds in).

Bring the strained berries back to a full simmer. Dissolve the cornstarch in the ¼ cup of water and whisk it into the simmering berries. Bring it back to a boil, and simmer for another five minutes. Cool/chill completely. It will thicken as it cools.

~~~~~~~~~~~~~~~~~~~~~~~~~~~~~

For the above raspberry turnovers, I just thawed a sheet of Pepperidge Farm puff pastry dough for 45 minutes and then floured my board a little. I unfolded the dough and rolled it out flat (about 2" bigger than right out of the box). I cut the sheet into 6 pieces and put a dollop of raspberry filling into the center and folded the dough over (wetting the edges) and crimping them. I cut small vent holes in the top of the turnovers and baked them on an ungreased sheet at 400 for 15-18 minutes (or until they were golden).

You can drizzle a glaze on them if you want, or just dust them with powdered sugar. Hubby likes them "unadorned". They are light as air, crisp and flaky, just right for breakfast or an instant dessert.


RASPBERRY FILLING FOOD RECIPES
By Coleen Marie
Read more >>

ITALIAN VEGGIE BAKE (and a Halloween heads up)

ITALIAN VEGGIE BAKE (and a Halloween heads up) Food Recipes, This is one of my favorite things to eat on the nights that hubby has opted to be carnivorous. It is a recipe big on flavor, veggies and cheese; my favorites are mushrooms, red peppers, onions, zucchini, beans, carrots, pasta, ricotta and Monterrey Jack cheese. It makes the BEST lunch on day two!!

In my world, bacon doesn't count as a meat, it is a flavor!!

½ cup onion chopped
½ cup celery chopped
1 cup chopped carrot
½ cup chopped red pepper
2 cups sliced mushrooms
2 cups diced zucchini
1 cup black beans
1 clove garlic minced
(1) 12 ounce can tomato paste
5 cups water
1 teaspoon salt
½ teaspoon pepper
1 teaspoon dry oregano
1 teaspoon dry sweet basil
1 teaspoon fennel seed
scant ¼ teaspoon red pepper flakes
2 teaspoons brown sugar
2 cups small pasta cooked
ricotta cheese
2 cups Monterrey Jack cheese (grated)
2 tablespoon butter

In a large, deep pan, saute the onion, celery and garlic (in the butter) until the are sweet, then scoot them to one side of the pan. In the same pan, saute the rest of the raw veggies until they start to wilt. Add everything else (except the pasta and cheeses) and simmer slowly, for about an hour (without a lid so the sauce will thicken up). After an hour, stir in the cooked pasta and 1 cup of cheese.

To assemble this dish, pour half of the veggie mixture into a greased baking dish and top with small dollops of ricotta cheese (randomly over the mixture...but not a solid layer). Top with the other half of the veggie mixture and cover with shredded Monterrey Jack cheese. Bake at 350 for about 25 minutes.

NOTE: You can use any combination of veggies that your family likes in this dish.
NOTE: Any small pasta will work, just make sure that when it is cooked, it is bite size or the same size as the chopped veggies.

HALLOWEEN HEADS UP: A great blogger named Peggy at Peggy's Pantry, has the cutest idea for a kids halloween party, or school party. It is SO CUTE, I wanted you to take a look (click here).

ITALIAN VEGGIE BAKE (and a Halloween heads up) FOOD RECIPES
By Coleen Marie
Read more >>

CHIFFON CAKE

CHIFFON CAKE Food Recipes, A chiffon cake is sort of like an angel food cake, except better (in my opinion). It is an egg white based (like an angel food cake) but it also has a lot of whipped egg yolks in the recipe, so it has just a little more "body" than an angel food cake and isn't quite as prone to "falling" when you bake it. It sort of reminds me of those little round yellow strawberry shortcake sponge cakes sold in cello-sixpacks in the store (except this cake is a million percent tastier and more moist than those).

1 cup of egg whites (about 8 eggs room temperature)
½ teaspoon cream of tartar
½ teaspoon salt
1½ cups white sugar (divided)
5 egg yolks
1 cup all purpose flour
2 tablespoons water
½ teaspoon almond extract
½ teaspoon vanilla extract
½ teaspoon lemon extract

Heat oven to 325. Beat egg whites, cream of tartar and salt in a large (non plastic) mixing bowl on medium speed until foamy. Beat in 1 cup of the sugar (on high speed) 1 tablespoon at a time (continue beating until stiff and glossy). Be careful not to under-beat. Set aside.

Beat egg yolks in a small mixing bowl until very thick and lemon colored (about 5 minutes). Beat in reserved ½ cup of sugar gradually (after 5 minutes, this mixture will look like lemon colored whipped cream at soft peak stage).

Add the flour to the egg yolk mixture, alternately with water and extracts on low speed. Gently fold the egg yolk mixture into whipped egg white mixture with a non-plastic utensil.

Spread in UNgreased 10" x 4" tube pan. Cut gently back through the cake batter with a metal spatula to break any large air pockets.

Bake in a 325 oven (bottom rack of oven) for 60 to 65 minutes or until the top springs back when touched lightly (my oven took 65 minutes). Remove from oven and turn pan upside down like you would for an angel food cake. Cool completely.

Run a long serrated knife, in a short sawing motion, around the perimeter of the cake (I use a thin bread knife) to release it from the pan.

NOTE: Don't peek (open the oven door) while this cake is baking. It is not good to jar your oven or cool off your oven while baking a cake.

NOTE: It is extremely important not to use any plastic bowls or utensils when preparing this batter. Also do not use silicone baking pans or ANYTHING that might have a trace of oil or grease on it. Grease or oil is "death" to egg meringues.
NOTE: You can also bake this cake in an oblong pan or jelly roll pan as long as you use parchment paper on the bottom and do not grease the sides of the pan. Baking time depends on the shape of the pan, but you can tell the cake is done when a toothpick, inserted in the center of the cake, comes out clean.

CHIFFON CAKE FOOD RECIPES
By Coleen Marie
Read more >>
 

All About Women Copyright © 2011 Design by Panji Media