NO-BAKE CANDY CAKE

NO-BAKE CANDY CAKE Food Recipes,

Follow Me on Pinterest
I found this idea on a web site a couple of years ago (long before I was aware of the blogging world). It is a fun (and easy) project which can be tailored to any age, holiday or special occasion. Need a gift for someone at work or school? Make them a small version. Make a huge version for a table centerpiece at a teenager’s birthday party. The possibilities are endless.

The “candy cake” pictured was made with a 9” cardboard circle for a base (I used a Wilton cake circle I had). Since the candy you are going to fill this with is heavy, the base cardboard needs to be pretty rigid, so…if in doubt, double-up your cardboard. If you double up your cardboard, wrap it in foil to disguise it.

Next, I hot glued two (flat) 8” Styrofoam wreath circles on top of each other, wrapped them in wide ribbon and glued them to the cardboard circle base. Now you should have a flat base with a ribbon wrapped “lip” around the outer edge of the base.

Next, attach mini-candy bars or mini-boxes of candy to the outside of the “lip” by placing a SINGLE small dot of hot glue on the back of the candy wrapper (use my photo as a guide). Now fill the hollow area inside of the Styrofoam wreaths with loose, wrapped candies.

Next, think about decorating the flat top of the Styrofoam “lip”. You can either glue more candy to it, or push lollipops, blow pops, or any candy on a stick, into the Styrofoam so it will add height.

NOTE: Plan ahead and make sure all of your candy bars are facing in the same direction. Keep your design or color theme in mind when you are choosing candy bars.

NOTE: If you are using hot glue on chocolate bars, remember just one little dot will suffice and if you are concerned about it, freeze them first.

NOTE: Do not use any unwrapped candy.
NOTE: If giving as a gift, this looks especially festive if you wrap it in clear cellophane and decorate it with lots of curly ribbons.

The hardest part of this project is not snacking on the candy while you are constructing it.
NO-BAKE CANDY CAKE FOOD RECIPES
By Coleen Marie
Read more >>

BEAR CLAWS

BEAR CLAWS Food Recipes,
These bear claw pastries are delicious. The dough mixes very easily (no kneading) and the filling for the pastry is equally as easy. The frustrating part is assembly. It is such a sticky dough, that it requires tons of flour on your counter and you have to wash your hands and utensils about every 30 seconds or so to make things work smoothly. Assembly is a little tricky and requires patience; if you can tolerate that annoyance, the final product is worth it. This recipe makes about a dozen nice size pastries, however the dough and filling will keep in the fridge for up to three days, so you do not have to bake them all at once.


PASTRY
1 cup butter
1 tablespoon of dry active yeast
¼ cup warm water
¼ cup white sugar
3 eggs yolks
½ teaspoon salt
(1) small (5 ounce) can evaporated milk
1 ½ cups all purpose flour
Melt the butter and let it cool down to 110 degrees (should only feel good and warm to the touch, not hot). Dissolve yeast in ¼ cup warm water. Mix these two liquids together and add ¼ cup sugar, egg yolks, salt, evaporated milk, and flour. Mix well and cover with plastic wrap and chill in fridge at least 24 hours (or up to three days).


PASTRY FILLING
½ cup butter (room temperature)
1 + 1/3 cups unsifted powdered sugar
2/3 cup all-purpose flour
8 ounces (1 cup) almond paste
1 teaspoon lemon zest
2 egg whites
¾ cup finely chopped almonds
Beat softened butter and powdered sugar until smooth. Add 2/3 cup flour and almond paste. Beat with electric mixer until crumbly and evenly mixed; add lemon zest and two egg whites. Beat until smooth. Stir in ¾ cup finely chopped almonds. Cover with plastic wrap and chill until firm (one to thee days).


ASSEMBLY
Put a nice thick layer of flour on your counter and rolling pin (this dough is STICKY, but you can dust any excess flour off later, with a pastry brush). Roll the dough out to a 20” x 12” rectangle, keeping the edges as straight as possible. Cut the dough (length-wise) into three sections, each about 4” wide.

Flour your counter and hands and roll the almond filling into three 20” “ropes” (the diameter of your thumb). Keep washing your hands because the filling is sticky too! Lay one of the “ropes” in the center of each 20” dough strip and flatten it just a little. Fold the dough over the “rope”, matching the other (cut) edge. Cut each filled 20” strip into 4” pastries (brush excess flour off with a pastry brush) and lay them on a parchment lined baking sheet. With a sharp knife, cut 3 slits in each pastry like this:

Sorry, I forgot to take a photo of this stage, forgive the crude drawing

Flour your knife so it does not stick to the dough and wipe it off often). Use the tip of the knife to separate the “claws” a little. Lightly beat the remaining egg white and brush over the bear claws. top with sliced almonds and sprinkle with sanding sugar. Let pastries raise for 45 minutes and then bake in preheated 375° oven for 15 minutes. Cool on wire rack. Makes about a dozen.


NOTE: I hope I have not scared you away from this recipe. It really is no harder than a simple piecrust, but I felt it only fair to warn you about the sticky dough.
NOTE: I put a simple glaze on some of the pastries and some I left plain. If you have trouble finding sanding sugar (it really adds a special shine and “finish” to baked goods), check Wal-Marts baking isle, near the sprinkles. They sell a Wiltons large grain transparent sprinkle that will work just as well.


BEAR CLAWS FOOD RECIPES
By Coleen Marie
Read more >>

WEEKEND SLOPPY JOES

WEEKEND SLOPPY JOES Food Recipes, Years ago, when our hungry teenage boys came home for dinner (with hungry buddies tagging along) it was a challenge to feed them all with one pan of Sloppy Joe's. Unexpected "guests" at the dinner table required some quick thinking. To "stretch" this simple recipe, I added kidney beans, extra shredded veggies and cheese. It was always a big hit. Necessity is the mother of invention I guess, thank goodness for versatile recipes like this one.

Another way I stretched this recipe for the kids, was to whip up a batch of biscuits (rolling the dough thinner than usual) and putting a big spoon of cooked Sloppy Joe filling on one side of the flattened biscuit, then folded it over to enclose the meat (pinching the biscuit dough shut). With a small knife, I cut a vent hole in the "turnover" and baked them on a greased sheet at 375 for 15 minutes (sort of a Hot Pocket type sandwich). They were a big hit and the boys dipped them in ranch dressing.


These days, with the kids all gone, I still occasionally go to this recipe as a “back up” when we go camping. I freeze the cooked filling in Ziploc bags (patted to a 1” flat shape so I can thaw it quickly). If bad weather prohibits us from cooking outdoors, this Sloppy Joe filling makes a quick “stuck in the motor home” lunch with no mess or fuss.

1 pound lean ground beef
½ cup chopped onion
1/3 cup chopped celery
1/3 cup chopped bell pepper
½ cup shredded carrot
2/3 cup ketchup
½ cup water
2 tablespoons Worcestershire sauce
1/8 teaspoon red pepper sauce (see note)
1 teaspoon salt
¼ teaspoon black pepper
5 hamburger buns, split and toasted

Cook the hamburger and onion together, chopping up the meat as it cooks (drain meat well). Stir in remaining ingredients (except buns). Simmer on med-low for about 15 minutes (to reduce the consistency of the sauce). Fill the hamburger buns with the beef mixture and serve.

NOTE: Don't know when the kids are coming home? Keep this sandwich filling hot in the crockpot.
NOTE: I serve these with a slice of cheese under the meat mixture and a squirt of yellow mustard on top of the filling.
NOTE: I never have red pepper sauce on hand, so I always use a pinch of dry red pepper flakes instead.

WEEKEND SLOPPY JOES FOOD RECIPES
By Coleen Marie
Read more >>

PINEAPPLE UPSIDE-DOWN CUPCAKES (and a Mini-Discovery)

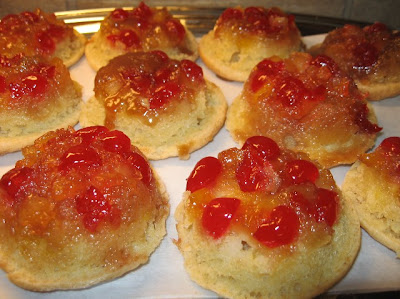
PINEAPPLE UPSIDE-DOWN CUPCAKES (and a Mini-Discovery) Food Recipes, These little pineapple upside-down cupcakes are super rich-gooey-yummy. They are easy enough for every-day eating and pretty enough for ANY holiday table. They are SO tasty (and portable) that they disappear very quickly. Recipe makes two dozen.


Spray your cupcake pans with vegetable spray. Line the bottoms of the cupcake pan with parchment (or wax paper) circles and spray lightly again. Preheat your oven to 350°.

TOPPING
6 tablespoons butter
1 cup brown sugar packed
2 tablespoons corn syrup
(1) 14 oz. can crushed pineapple (drained)
maraschino cherries quartered

Drain crushed pineapple completely (squeeze it as dry as you can). In a small saucepan, heat the butter, brown sugar, corn syrup and drained pineapple until the sugar is dissolved (stirring constantly). Remove from heat and set aside. Drain and quarter a small jar of maraschino cherries. Put the quartered cherries in the bottoms of the cupcake pan. Pour topping over the cherries (dividing equally between the 24 cupcakes). Set aside.

CAKE PART
3 eggs
2 cups sugar
1 cup vegetable oil
1 cup sour cream
2 teaspoons vanilla extract
1 teaspoon butter extract
2½ cups flour (spoon into cup, level off)
½ teaspoon baking soda
1 teaspoon baking powder
½ teaspoon salt

Beat eggs and sugar until thick and lemon colored. Beat in oil, sour cream and extracts till smooth. Add dry ingredients and mix until smooth. Fill each cupcake cup 2/3 full. Bake at 350° for 25 minutes or until cake tests done. Cool pans on rack for 5 minutes. After five minutes, loosen sides of cupcakes with a thin knife and gently turn cupcake pans over onto parchment paper. Let the pan (and cupcakes) stay upside down for a few minutes. Lift pan off (see note).
NOTE: No matter how well you grease the pan, SOME of this fruit-sugar mixture will stick/stay in the pan. Don’t panic, just scoop it out and “frost” the bottom the inverted cupcakes.

MINI-DISCOVERY
My hubby loves pizza…the cheesier and meatier the better (click here for my pizza recipe). Personally, I prefer a vegetable pizza but it always seemed to be missing something (like pepperoni lol). Tonight, I made my usual veggie pizza but I added black beans. Yowza, it really made a huge difference. For some strange reason (maybe it’s the texture?) the pizza with black beans was SO satisfying and I didn’t even miss the “pizza meat” (like I usually do). If you haven’t tried black beans on your veggie pizza yet…give it a try!

Mushroom, onion, red bell pepper, broccoli and black bean pizza


PINEAPPLE UPSIDE-DOWN CUPCAKES (and a Mini-Discovery) FOOD RECIPES
By Coleen Marie
Read more >>

MUSHROOM & CHEESE STUFFED HAMBURGERS with HOMEMADE BUNS

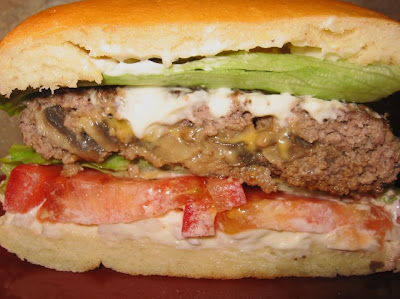
MUSHROOM & CHEESE STUFFED HAMBURGERS with HOMEMADE BUNS Food Recipes, Spring is here (even here in Alaska) and thoughts turn to outdoor barbeque's and camping. I’m always on the lookout for easy recipes that will “hold up” well in the cooler and Mushroom Stuffed Hamburgers is a good one. You can make the patties ahead of time and freeze them solid (which will help insure food safety while you travel.) Just throw these frozen patties on the grill and pair them with homemade hamburger buns (recipe follows) and you have a delicious cookout!
Can you tell that someone in my house loves mayo? LOL
(makes 4 hamburgers)
1 pound of lean ground beef
1 egg
2 tablespoons finely chopped onion
¼ cup dry bread crumbs
2 tablespoons ketchup
1 teaspoon Worcestershire sauce
¼ teaspoon black pepper
8 ounces of fresh mushrooms (sautéed)
favorite cheese

Each of these hamburgers is made out of two thin patties with mushrooms and cheese sandwiched in between. So mix everything (except the mushrooms & cheese) and make 8 thin patties. Top four of the patties with sautéed mushrooms and your favorite cheese and then a 2nd thin patty, pressing to seal the edges well. Repeat for the other three hamburgers.

If you are going to freeze these, wrap each one individually in plastic wrap and lay them flat on a cookie sheet to freeze. When they are frozen, you can stack them in a freezer Ziploc bag. Whether you are taking these on a camping trip or just leaving them in the freezer for a quick weeknight meal, they taste great.

HAMBURGER BUNS

This recipe will make at least 2 dozen hamburger buns. Once baked, they freeze extremely well. I find myself using them for everything from breakfast sandwiches to peanut butter sandwiches.
5 cups of all purpose flour
2 packets of dry active yeast (I use 2 tablespoons)
3 tablespoons sugar
3 tablespoons vegetable oil
1 tablespoon salt
2 ½ cups very warm water


In an electric stand mixer, place 2 cups of flour, yeast, sugar, oil and salt (stir to combine dry ingredients) Add 2 ½ cups of very warm water (see note). Stir quickly while you add the water. Let this mixture sit for about 10 minutes.

Add the rest of the flour, about ½ cup at a time, scraping the sides of your bowl and dough hook each time. Every time you stop your mixer, turn all of the dough mass over. Let your machine knead this dough until it CLEANLY comes away from the side of your mixer. If you have added all 5 cups of flour and it has not come cleanly away from your bowl, you need to add just a little more flour.

Once the dough comes cleanly away from the sides of your bowl, let the machine knead it for about five more minutes. Remove the dough and grease the bowl. Return the bread to the greased bowl and grease the top of the dough. Cover the dough with plastic wrap and let it rise for an hour (it will more than double in volume).

Punch the air out of your dough and let it rest (covered) for 15-20 minutes. This step is important because your dough will “behave” much better while you form it, if you follow this step. Pinch off pieces of dough about the size of a tangerine. Make each ball as round as you can. Roll each ball into a 5” circle. Resist the temptation to add more dough to make a thicker bun. At this stage, your buns need to be a lot thinner than you think. (about ½” thick). If you add more dough, you are going to end up with a burger bun the size of your face!

Place the formed buns on a greased baking sheet and spritz the top of the dough with just a little cooking spray. Cover with plastic wrap and let rise for about 45 minutes. Bake at 400° for 15-16 minutes.

If you are going to freeze these buns, let them cool completely first and freeze as soon as possible. About 4 to 5 minutes in a 350° oven will heat a frozen burger bun and make it taste like it was just baked.


This recipe also makes excellent sandwich bread

MUSHROOM & CHEESE STUFFED HAMBURGERS with HOMEMADE BUNS FOOD RECIPES
By Coleen Marie
Read more >>

APPLE TART

APPLE TART Food Recipes, There is nothing quite as American as apple pie, isn’t that the old adage? I started experimenting with apple pie recipes many years ago because it is one of my husbands favorites. This recipe is pretty easy, as pies go; it has a no-roll shortbread type crust and you pre-cook the apples so they bake quicker. I like this recipe because it makes a pretty presentation and it is baked in a two piece tart pan, so you can just life the tart out of the pan and set it on a pretty serving plate.
CRUST
2 cups all purpose flour
1 cup butter flavored Crisco
1½ teaspoons white sugar
½ teaspoon salt
¼ cup ice water
1 egg
1½ teaspoons distilled white vinegar

With your electric stand mixer, mix the flour, Crisco, sugar and salt together. Add the ice water, vinegar and egg, beat just until smooth. Divide dough in half and pat one half into the two piece tart pan, pushing it up the sides, to the top of the pan, set in the fridge for a few minutes. Cover the other half of the dough while you do the apples.

APPLE FILLING
Peel and cube 5 granny smith apples. Boil them in some plain water for about 4 or 5 minutes until they just start to get tender, then drain well. To these apples, add:
½ cup of brown sugar
½ cup of white sugar
¼ cup of white flour
¾ teaspoon cinnamon
dash of salt
Stir gently until everything is wet, set aside.

Roll out the second half of the dough and cut into narrow strips. Put apple filling into tart crust and dot with 2 tablespoons of butter (tiny little dots). Lay the crust strips over the apples. Brush the strips with egg wash (1 egg beaten with a little water). Sprinkle strips with a light dusting of white sugar.

Bake in a pre-heated 375 oven for 40-45 minutes or until the crust strips are nice and golden. Let the pie cook to room temperature before you try to remove it from the two piece tart pan.

NOTE: You do not HAVE to pre-cook the apples, but if you do it this way, you will not get a soggy crust, or have any loose (watery) pie filling.
NOTE: If you do not want to do the whole roll out strips on top of the pie, just mix the following ingredients and sprinkle it on top of the apples and bake the same way.

APPLE CRISP TOPPING (ALTERNATIVE)
¾ cup brown sugar
½ cup all purpose flour
½ cup quick cooking oats
½ teaspoon cinnamon
½ teaspoon nutmeg (optional)
1/3 cup butter softened
APPLE TART FOOD RECIPES
By Coleen Marie
Read more >>

EASY CHEESY CHICKEN WRAPPED IN SPINACH TORILLAS

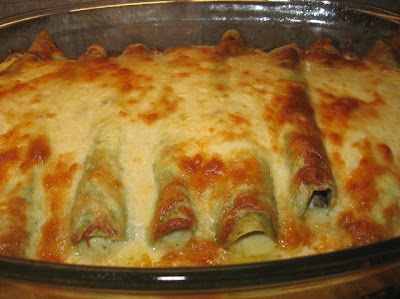
EASY CHEESY CHICKEN WRAPPED IN SPINACH TORILLAS Food Recipes, This is a very quick, satisfying and easy-cheesy chicken meal that the whole family will love. It is also a great “go to” recipe when you have unexpected guests for dinner. It also reheats well.

1 tablespoon olive oil
1 medium onion chopped
(1) 4½ ounce can of chopped mild green chilies
pinch of crushed red pepper flakes
½ cup sour cream
3½ cups of cooked chicken (chopped or shredded)
black pepper to taste
(8) 8” spinach flavored tortillas
4 cups Monterey Jack cheese shredded (divided)
1 can of cream of chicken soup
¼ cup of chopped onions
¼ cup chopped celery
¼ cup chopped carrots
2 heaping teaspoons of chicken bullion granules
1½ cups of half & half
¼ teaspoon black pepper

Sauté the chopped onion in the olive oil for about 5 minutes; add the chilies and red pepper flakes and sauté for 1 more minute. Add the sour cream, chicken pieces and 2 cups of the Monterey Jack cheese.

Spoon 2 big spoonfuls of chicken-cheese mixture onto the tortilla (dust lightly with black pepper) and roll up. Place, seam side down in lightly greased 9x13 baking dish.

Saute ¼ cup finely diced onion, ¼ cup finely diced celery and ¼ cup finely diced carrot until almost tender. Whisk the sauted veggies, bullion, half and half and pepper into the cream of mushroom soup until smooth and lump free. Pour over the chicken wraps and cover with remaining 2 cups of cheese. Bake at 350° for 45 minutes or until cheese is bubbly and brown. Let chicken wraps sit for a few minutes before you try to cut them.
NOTE: A whole pre-roasted deli chicken (cut into pieces) works great for this recipe.
NOTE: If I have the time, I put 4 chicken breasts into the crockpot along with a box of
chicken broth (not bullion) and some onions and celery and let it cook on low overnight. The next morning, I put the chicken into the fridge and save the chicken stock for soup or another dish (it freezes well). The super tender chicken pulls apart easily to make this enchilada dish.


EASY CHEESY CHICKEN WRAPPED IN SPINACH TORILLAS FOOD RECIPES
By Coleen Marie
Read more >>

CHEESY FOCACCIA

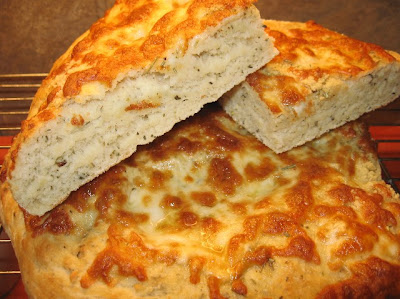
CHEESY FOCACCIA Food Recipes, This is the easiest bread I have ever made. It is FULL of flavor and is soft and chewy with a delicious cheesy surface. Whether you use it to sop up a great sauce…or slice it for a sandwich, this recipe is a winner. The smell of it baking will bring your family running to the table.
2 ¾ cups all purpose flour
1 teaspoon salt
1 teaspoon sugar
1 tablespoon dry active yeast
1 clove garlic minced
1 teaspoon dried oregano
1 teaspoon dried thyme
1 teaspoon dried basil
¼ teaspoon black pepper
2 tablespoon olive oil (divided)
1 cup warm milk
1 tablespoon parmesan cheese
1 cup mozzarella shredded
1 teaspoon dried rosemary

Mix first 9 ingredients in the bowl of an electric mixer. Mix in warm milk and 1 tablespoon of olive oil. Mix well and knead until the dough is smooth and elastic (it will take just a couple minutes). Cover with plastic wrap and let this sit in a warm place for about 45 minutes. Punch down and place on a greased baking sheet. Pat dough out into a rectangle about ½” thick. Brush top with remaining 1 tablespoon olive oil and sprinkle with rosemary, mozzarella and parmesan cheeses. Cover loosely with plastic wrap and let this sit for about 30 minutes. With 2 fingers, make dents every few inches over surface of focaccia. Bake at 450° for 15 minutes or until golden. Remove to a rack.


This hearty bread also makes an excellent sandwich.

Make sure you pop over to Tried and True Cooking With Heidi
She is giving away a prize to celebrate her 100th post.

CHEESY FOCACCIA FOOD RECIPES
By Coleen Marie
Read more >>

BACON WRAPPED SHRIMP

BACON WRAPPED SHRIMP Food Recipes,

Your guests will never guess how simple these shrimp are to make and YOU will be amazed how quickly they disappear; they are an absolutely delicious hors d’oeuvre.

(1) 16 ounce bag of frozen 16-20 count RAW shrimp (see note)
1 pound of smoked bacon (not the thick kind)
1 cup of your favorite barbeque sauce

In our Fred Meyer store, these shrimp are sold frozen (near the meat case). The one pound package says they are 16-20 count “Wild Caught” with shell on and heads off. Let them thaw in your fridge overnight. The next day, remove the shell (leave tails on). With a small sharp knife, make a shallow cut down the back of the shrimp and rinse out any “vein” you see there. Drain the shrimp on a paper towel and sit in fridge for a few minutes while you prepare the bacon.
If you use the 16-20 count shrimp (16 to 20 shrimp per pound), it will take a whole slice of bacon per shrimp. Make sure you use regular cut bacon (not thick sliced). Partially cook it, to remove some of the fat, but don’t let it get crispy (drain on paper towels). It should look like this:
Wrap the partially cooked bacon around the raw shrimp. Starting at the wide end of the shrimp, attach the bacon to the shrimp with a toothpick. Wind the bacon around (in a single thickness) and all the way down to the tail and secure it with another toothpick like this:
Baste the shrimp on both sides with your favorite barbeque sauce (I recommend Sweet Baby Ray’s barbeque sauce). Cover with plastic wrap and refrigerate for two hours.

Line a large baking sheet with foil (to help with cleanup) and put a baking rack on the foil (spray the rack with cooking spray). Place the shrimp on the rack and bake in a PREHEATED 450° oven for 10 minutes. After 10 minutes, TURN OFF THE OVEN (do not open the door) and let the shrimp sit in the hot oven for another five minutes. Remove the toothpicks and enjoy!

BACON WRAPPED SHRIMP FOOD RECIPES
By Coleen Marie
Read more >>

SWEET DARK CHERRY PUDDING CAKE

SWEET DARK CHERRY PUDDING CAKE Food Recipes,
I WISH I COULD UPLOAD THE SWEET AROMA OF THIS CAKE!!
When I look through recipes, I am always searching for that “little something” that tells me THIS one deserves a second look. Whether it is a unique ingredient or a non-traditional technique…it’s like a light comes on and you know you have to try it. This is one of those recipes. The descriptive title caught my eye first, then the recipe called for a simple batter, topped with frozen fruit and a cup of boiling water…need I say more? The result was delicious and something I would definitely serve to guests.

Today, hubby and a couple friends were out in the garage (doing guy stuff with their snow machines), so I thought it would be a great opportunity to use them as taste testers. The recipe went together like a dream (no electric mixer required) and the guys consumed the entire pan in just minutes and all gave it enthusiastic thumbs up.

1 cup all purpose flour
¾ cup white sugar
2 teaspoons baking powder
¼ teaspoon salt
½ cup milk
3 tablespoons vegetable oil
2 cups frozen pitted dark sweet cherries
1 cup brown sugar packed
1 teaspoon cinnamon (do not leave this out)
1 cup boiling water
1 tablespoon lemon juice
Preheat oven to 350°. Combine the flour, white sugar, baking powder and salt in a bowl (stir to mix). Stir in milk and vegetable oil, just until smooth (do not over mix). Spread batter into un-greased 8” x 8” baking dish. Cut frozen cherries in half and lay on top of batter. It’s a lot of fruit…

Combine the brown sugar and cinnamon and sprinkle evenly over cherries. Stir lemon juice into one cup of boiling water and SLOWLY drizzle the lemon water over the brown sugar (evenly). Bake 55 to 60 minutes or until a wooden pick comes out clean.

This cake will not cut like a traditional cake because the boiling water finds its way under the batter and makes a fabulous sweet sauce that the batter sort of “floats” on as it bakes (sounds weird, but it works). That’s why you HAVE to do the toothpick test (for doneness) in the very center of the cake (as opposed to the edge). I ended up scooping out portions of cake (rather than slicing it) and then spooned the sauce over it and topped it with ice cream.

Click on this photo to enlarge and you can see the thick sauce (off to the left) that the cake makes.

NOTE: There are no eggs in this recipe.
NOTE: Do not thaw cherries. Make sure you use DARK SWEET FROZEN CHERRIES. You will find them in one pound bags in the same place as frozen strawberries & frozen puff pastry.
NOTE: When you cut the cherries in half, watch for any pits.
NOTE: Serve this about 20-30 minutes after you take it out of the oven (to give the sauce a few minutes to thicken a little).
NOTE: If you serve this cake warm...ice cream is MANDATORY !!!
NOTE: Cake is excellent at room temperature too.
SWEET DARK CHERRY PUDDING CAKE FOOD RECIPES
By Coleen Marie
Read more >>
 

All About Women Copyright © 2011 Design by Panji Media